
You’re interacting with digital interfaces on a daily basis when using websites, apps, and other pieces of software. Your experience with them heavily depends on the quality of the UX writing that guides you.
UX writing involves everything:
- 💬 from notification texts,
- ➡️ menu items,
- ℹ️ button texts,
- ✅ and success/error messages;
- 📄 to documentation...
- 🖋️ and style guides.
Today, we will look at some stellar examples of UX writing and the process that goes behind producing work that’s equally great. This will help you better understand the process as a writer and simplify your work as an editor, too.
✍️ 7 examples of great UX writing 🔗
We’re saying that the UX writing process is important, but nothing is better than showing it, right? So, here we have some examples of exceptional UX copy.
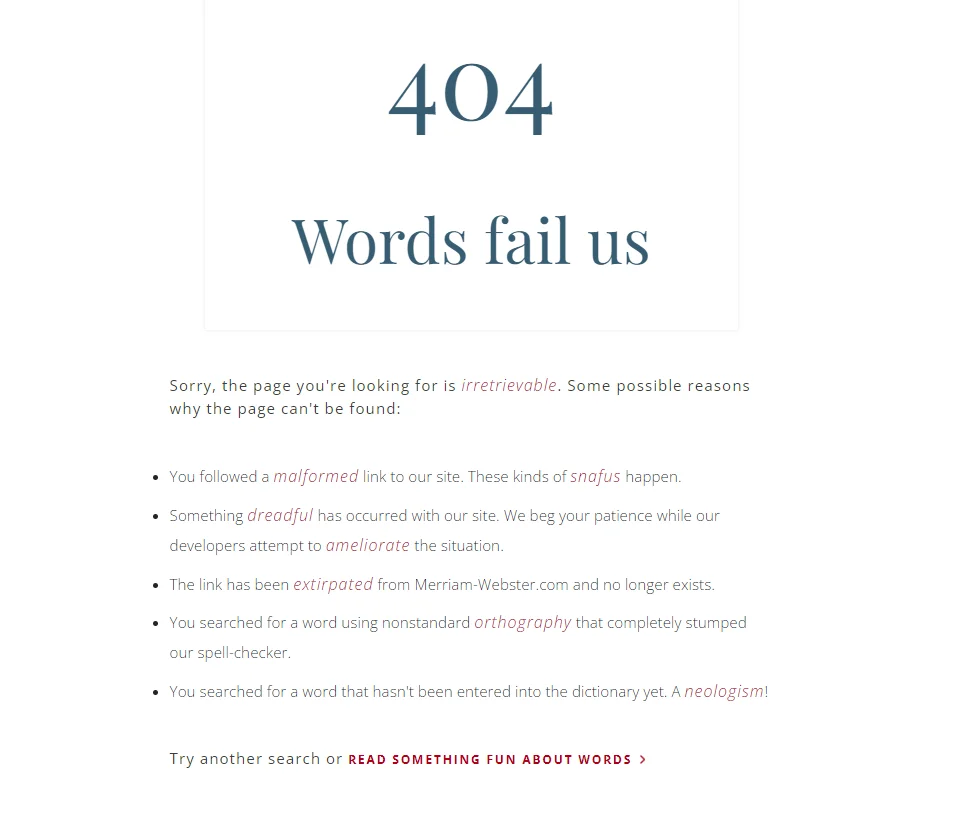
Merriam-Webster's error page 🔗
Error pages have to be boring and technical, right? Not for Merriam-Webster. ✨ Not only do they find a way to make it fun and simple, but they also teach you some new terms along the way. They stick to their niche while welcoming errors with an informative page.
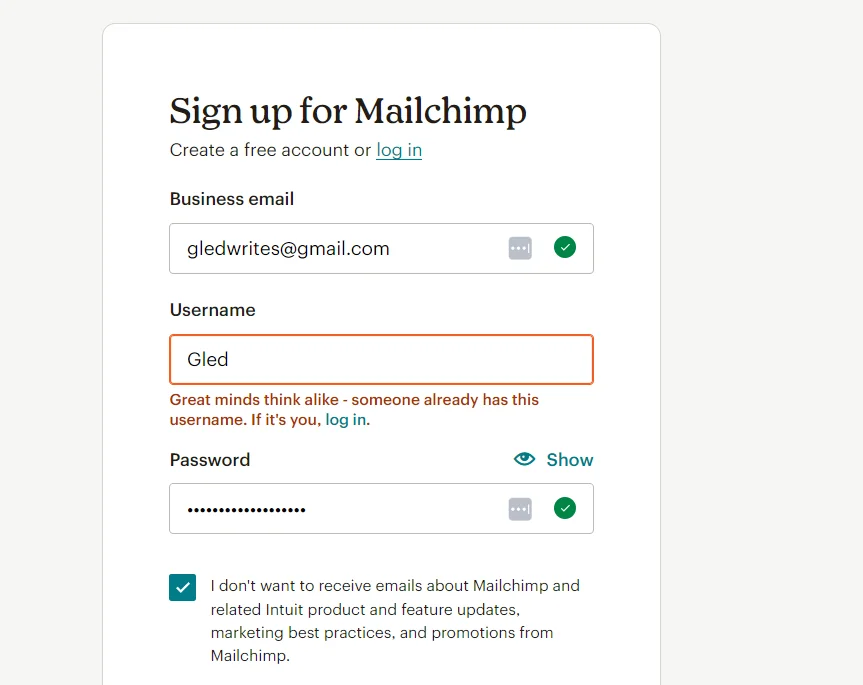
Mailchimp's sign-up form 🔗
Registration forms are one of the places where you can write playful UX copy while sticking to your brand voice and delighting users. MailChimp does this perfectly when you register as a new user and the username you’re trying to use is taken.
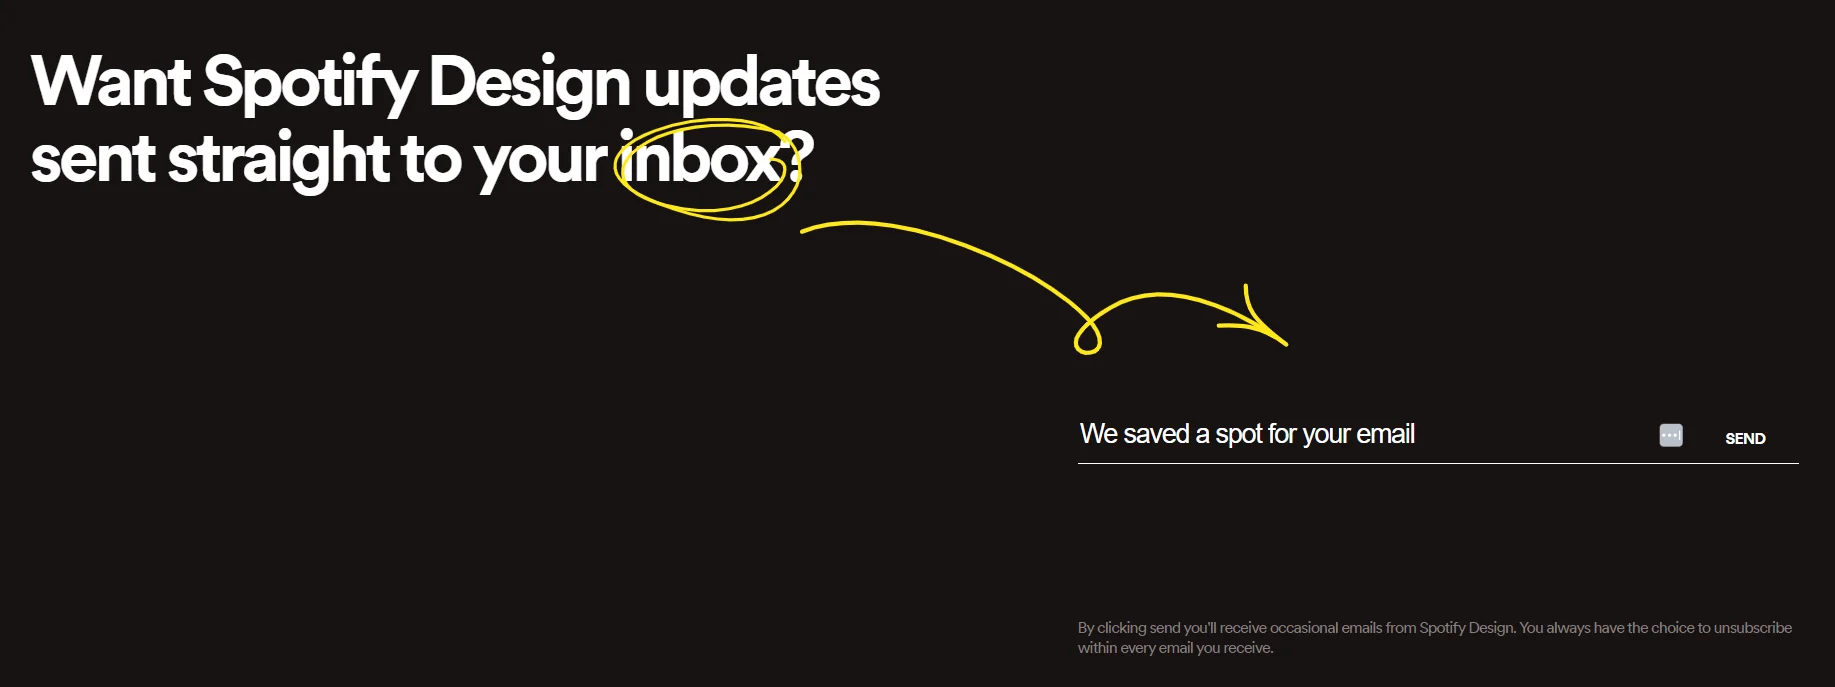
Spotify Design: Newsletter sign-up 🔗
There are only so many ways to invite readers to subscribe to your newsletter, and the Spotify Design team has found one of the more engaging ones. Instead of simply saying, “Enter your email,” they’ve said, “We saved a spot for your email,” which is much better.
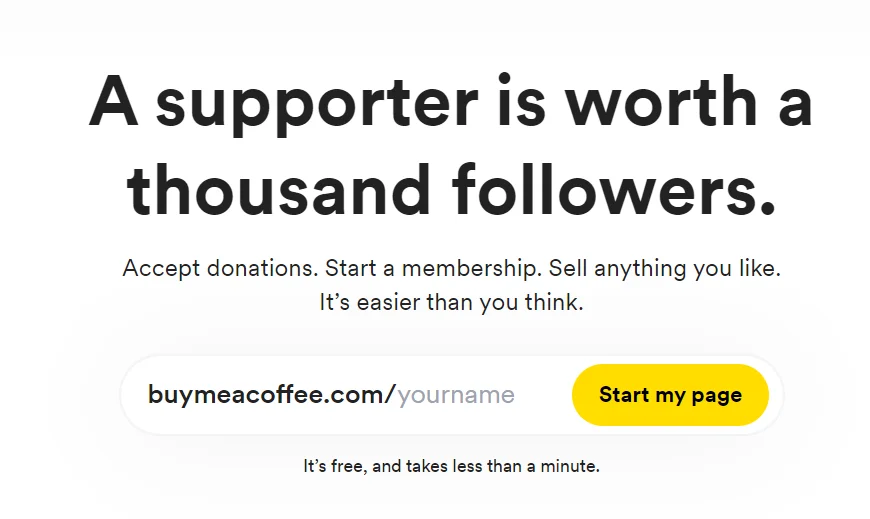
Buy Me a Coffee homepage 🔗
The goals of UX writing are to guide the user in using your product, and simplifying the process while keeping it engaging. The Buy Me a Coffee homepage and sign-up copy are so seamless that make joining the platform a breeze. The “Start my page” button beats the traditional “Join” or “Sign up” versions.
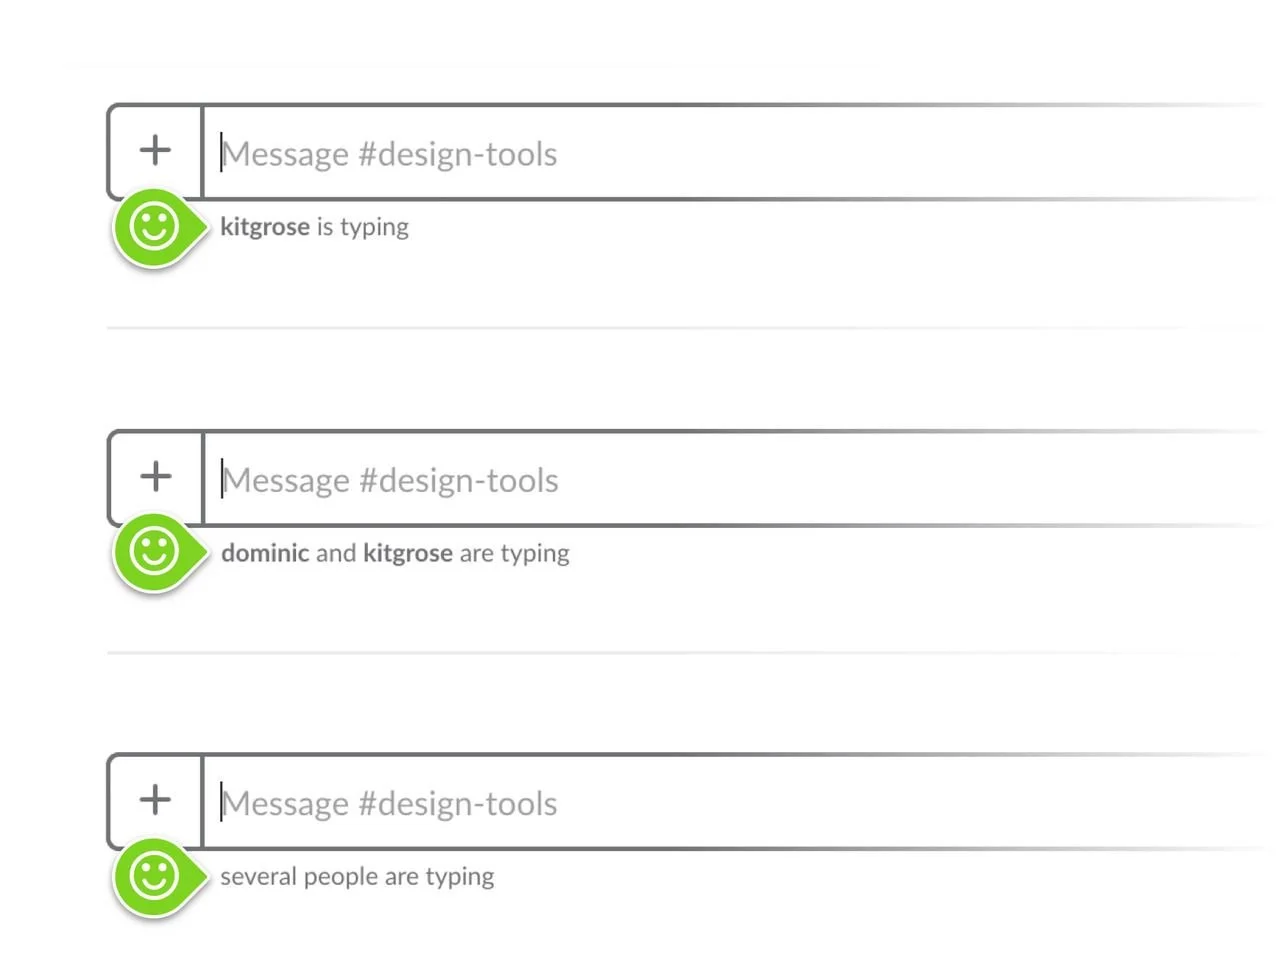
Slack’s typing microcopy 🔗
If you’re part of an active channel, Slack displays under the textbox when someone is typing. You’ll see the actual names when up to two people are typing, but when more than two are typing, you’ll see “several people are typing”, which is more convenient than showing the names of everyone typing.
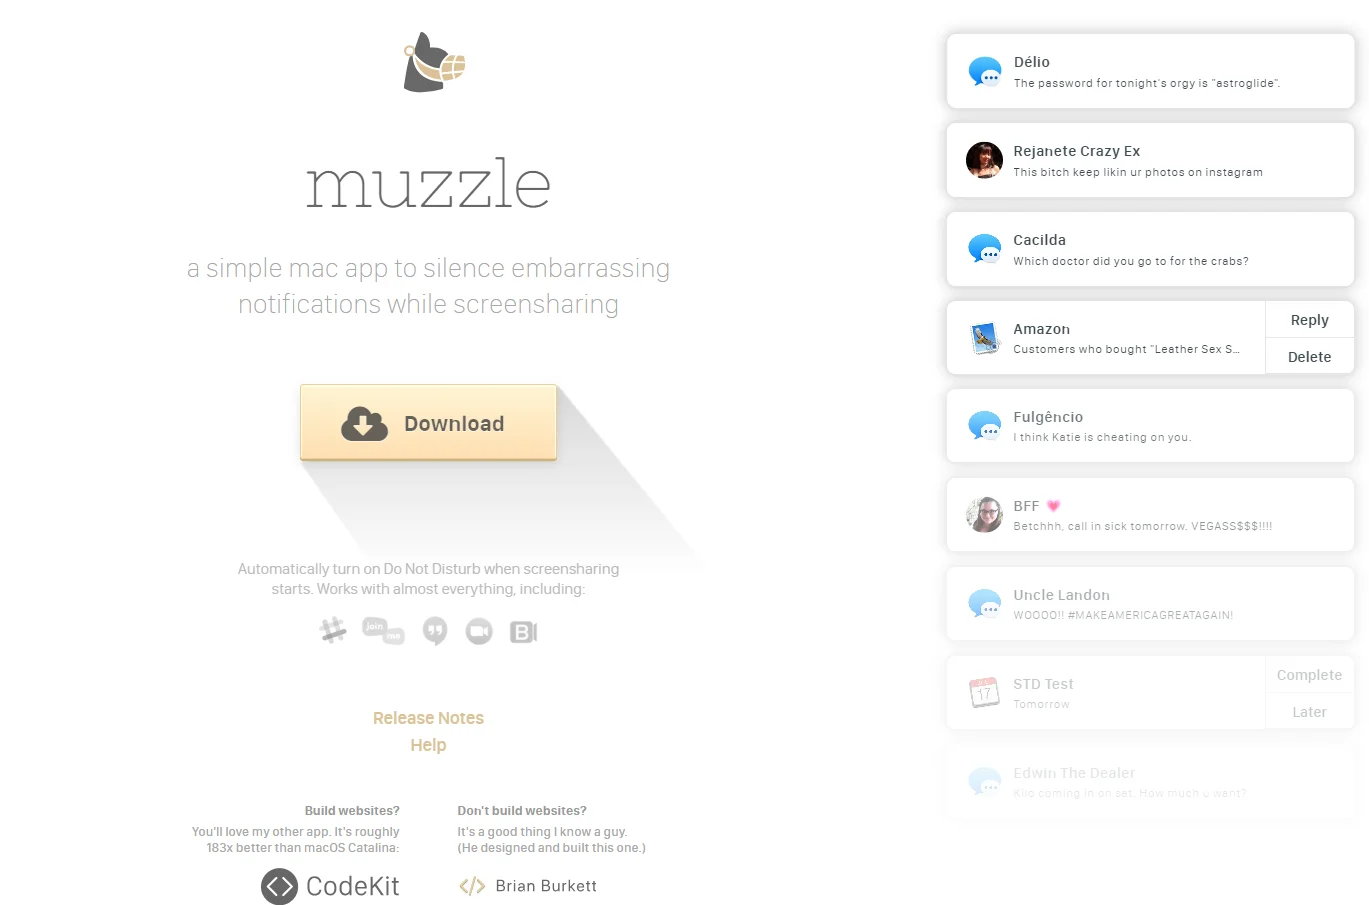
Muzzle App landing page 🔗
Showing instead of telling is powerful in writing. That’s what the Mac notification silencing app Muzzle does. It shows examples of embarrassing notifications you’d want to avoid. The fake alerts make the microcopy fun but piercing. While not all microcopy needs to be hilarious, like in this case, this is a distinguished example.
Now, let’s have a look at the UX writing process and how we can manage to comb through it with ease. 🔍 After going through these examples of great UX writing, you must be curious to know what it takes to produce such microcopy. Well, let’s explore the process together, shall we?
📝 The UX writing process in 7 steps 🔗
When looking at UX writing, you’ll see that the process is quite different from other types of marketing writing. That’s because UX writing has different goals compared to it. UX writing fights for clarity and brevity over persuasiveness. With this said, let’s have a more in-depth look at the process.
1. Understand the brief and project scope 🔗
Every project comes with a brief, and UX writing is no different in this aspect. Depending on the project, a UX writer will either be handed a brief and a project scope outlining the goals of the user and the guidelines they need to follow, or they'll have to be involved in the research process themselves to figure these out.
The latter is more common in big projects. One common mistake that brands might make is not to involve UX writers early in their projects. 🗓️ Unlike copywriters or content writers, UX writers need to be involved in the early stages of building the product so they can collaborate with designers and produce interfaces that flow well.
Being involved in the early stages of product building allows UX writers to understand the goal of end users and collaborate with designers to create the perfect interface
2. Conduct competitor research and analysis 🔗
Even if you’re not involved in the research process (which you must be), you’ll need to do your own research before writing. This often includes looking up the digital assets of your competitors and analyzing what has worked well for them. But if you are involved in the research process, these are some well-known methods you could be using:
- ✏️ Surveys,
- 🖇 card sorting,
- 👀 eye tracking,
- 🎧 usability testing,
- 👥 and surely user interviews.
With the necessary research, you’ll be able to spot patterns in your competitors' work and find what kind of vocabulary dominates their assets. However, user interviews are more likely to supply you with such insights.
3. Build a content model 🔗
You have probably heard of wireframes. Wireframes, the content model, and information architecture are similar. They guide you with a templatized version of the information you need to use to further write texts for your product.
What texts are we talking about, and why would you need a content model? 🤔 Well, you’ll need to write texts for notifications, buttons, error messages, CTAs, etc. You’ll write texts for one type of element more than once. Creating a content model will help you have templates to speed up the process so you maintain the same style and brand voice and don’t start it from scratch every time.

4. Ideate and write the copy 🔗
The writing process starts when the first wireframes are ready by the design team. During this phase, you as a writer have to come up with different text versions for the interface elements ideated. These are rough drafts that will be polished later, so consider this more like a brainstorming phase.
The structure of the screens and the flow, which will be set by the designer, facilitate your first drafts. Here, your duty as a writer is to produce as many relevant versions as possible, which will later be refined. Depending on the workflow, you might create samples by adding copy to the design file or simply adding it to a spreadsheet.
5. Add copy to a prototype 🔗
As discussed in the previous step, you’ll either add the copy to the design or the designers themselves will do it. 🧩 And if you’re not the one adding it, you’ll review everything to confirm that your copy is in place. Once you’re done and you’re on the same page with the designer, the first prototype will be completed.
It’s normal for misalignments to occur. The design and the words might not fit well together, so you’ll have to go back and forth with the UX designer until you reach an appropriate final version. The key here is to make changes with the end user in mind.
📖 Recommended read: How and why we built our Figma localization plugin
6. Test and refine 🔗
After the first version of your prototype is live, the real challenge starts: implementing user feedback. You’re expected to refine the copy by taking into account the user’s reactions. You are responsible for reiterating your copy after each test, and this is a process that continues over time as the user needs change and the product evolves.
There is no finalization for this process as you’re constantly receiving user feedback that needs to be implemented. You can look at it from an innovative perspective: you’ll eventually revise the copy so many times it'll near perfection. 🏆 They say that great writing is in the editing, and as a UX writer, you’ll see the results of this theory yourself.
After the first version of your prototype goes live, you'll be expected to refine the copy by listening to user feedback. As a UX writer, you'll go over the same text countless times: remember that great writing is in the editing
7. Create documentation 🔗
Documenting your research and writing process can help you reuse previous insights and ideas later on and make sure you’re not forgetting anything. Keeping track of the changes and the different user feedback makes the writing and revision process easier, and ensures no idea is lost.
💡 Some key steps to keep in mind:
- Document the key changes, decisions, and feedback,
- document the work process as it happens,
- and allow teammates to easily access it.
It’s never too early to start documenting your work, and you will see how that rewards you down the line. You’ll see the emergence of patterns that will inform your writing and guide you in establishing practices and content models, and help you avoid writer’s block.

📌 Final thoughts 🔗
Being a UX writer comes with its own fair share of challenges. Especially when you’re in a competitive industry that changes fast. However, the process is beautiful. When you think about it, you’re responsible for building interfaces that users will visit and revisit to solve their problems, and your words will be like a good friend who guides them along the way.
UX writing and localization share a common vision: creating better user experiences. International brands need localization to truly expand into new markets, but good localization isn’t possible without clear and high-quality UX writing. Without good writing, there’s nothing worth translating. But once you’re past that phase, Localazy makes localization a breeze.